What Are the Disadvantages of Ground-Mounted Solar Panels?
Ground-mounted solar panels are an excellent choice for homeowners and businesses looking to maximize solar energy production without being limited by roof space. However, while they offer benefits such as optimal panel orientation and easier maintenance, there are also some disadvantages to consider. Understanding these drawbacks can help in making an informed decision when choosing between roof-mounted and ground-mounted solar installations.
1. Higher Installation Costs
One of the main drawbacks of ground-mounted solar panels is the higher installation cost compared to rooftop systems. The additional expenses come from:
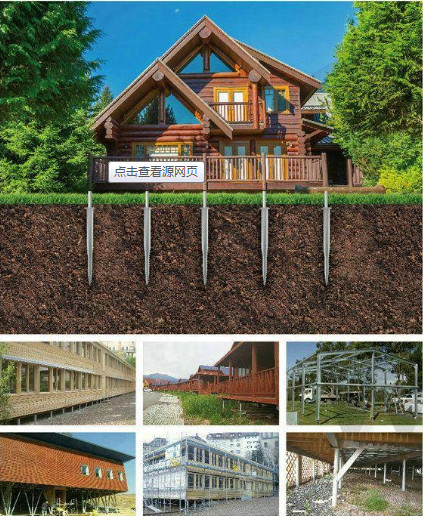
✅ Mounting Structure – Unlike rooftop solar, ground-mounted panels require a dedicated racking system, adding to material and labor costs.
✅ Land Preparation – Clearing and leveling the land before installation may require extra work and investment.
✅ Trenching and Wiring – Since ground-mounted panels are farther from the electrical connection point, additional trenching and wiring may be needed, increasing costs.
Despite the higher upfront costs, a well-designed system can deliver excellent long-term returns. SIC Solar, a professional manufacturer of photovoltaic mounting systems, offers durable and cost-effective ground-mounted solutions that help optimize solar investments.
2. Requires More Space
Unlike rooftop solar, which makes use of existing structures, ground-mounted systems need open land. This can be a challenge in urban areas or locations with limited available space. Factors to consider include:
✅ Land Use Restrictions – Some properties may have zoning restrictions limiting ground-mounted solar installations.
✅ Land Occupation – Using land for solar panels may reduce space available for other purposes such as farming, landscaping, or recreational use.
However, for properties with ample land, ground-mounted systems provide a flexible and scalable solar energy solution.
3. Exposure to Environmental Elements
Since ground-mounted solar panels are installed at ground level, they may be more vulnerable to external environmental factors, such as:
✅ Snow and Debris Accumulation – Panels closer to the ground are more likely to collect leaves, dirt, and snow, which may require frequent cleaning.
✅ Potential for Damage – Panels are at a greater risk of being damaged by animals, lawn equipment, or vandalism.
To mitigate these risks, robust racking systems and protective fencing can be installed to safeguard the panels. SIC Solar provides high-quality mounting structures designed for durability and weather resistance.
4. Longer Installation Time
Compared to rooftop installations, setting up a ground-mounted solar system takes longer due to additional groundwork and structural assembly. Key factors contributing to longer installation times include:
✅ Permitting and Site Preparation – Obtaining permits and preparing the land can take time, especially if excavation work is required.
✅ Foundation Installation – Depending on the soil type, ground screws or concrete foundations may be needed to secure the mounting structure.
While the process may take longer, ground-mounted solar systems can deliver higher energy output and efficiency due to better sun exposure and airflow.
While ground-mounted solar panels offer significant advantages such as optimal sun exposure and easier maintenance, they also come with challenges, including higher costs, space requirements, and exposure to environmental risks. By selecting a high-quality mounting system from SIC Solar, many of these challenges can be addressed, ensuring a stable and efficient solar installation.
Looking for a reliable ground-mounted solar racking system? SIC Solar provides innovative and durable solutions for maximizing solar energy production.